Showing posts with label Terrain. Show all posts

Monday, February 10, 2025

Thoughts on Terrain


I've had stints in the past where I spent a bunch of time building Warmachine terrain, and I've had mixed results, but I'm starting to feel the itch again, so I thought I'd start a discussion here about terrain.

Lots of folks have different opinions about 2d or 3d terrain and which is better, but the two key features about terrain that interest me personally are what its mechanics are in gameplay, and how good it looks.  Most of my ideas and observations in this post will be about either how cool a terrain piece may look, or how its rules can affect play.

I'd like to categorize things to organize my own thoughts. This is likely to be long, so I'll include some headers on the sections to make skipping around easier.

BUILDINGS AND OTHER OBSTRUCTIONS

This is probably the largest single category, and as such I'll try hard not to say too much here because it could easily be an entire article. A couple of the more interesting things about buildings specifically is the ability laid out in MK4 rules for a building to use sculpted stairs or ladders. If you end your movement within one inch of a ladder or stairway, you can then place your model anywhere within one inch of its other end. This allows for some fairly interesting and cool terrains, where your model may be able to climb to the top of a wall parapet. However, this type of feature is far more likely to be used in casual play, since it creates so many janky rules questions - how high vertically can my melee attack reach?

And once you introduce ladders and stairs, you introduce elevation, which allows for another seldom-used mechanic in warmachine: falling. When's the last time your model has been pushed off a ledge by a thunderbolt shot and suffered fall damage? 

Buildings also have the ability to be both habitable and/or destroyable, but the community has largely abandoned these mechanics, and my bunker and guard tower both sit and collect dust.

The ability for buildings to look good is one of the things that really interests me about them. I think of the time I created a burned out Khador building and glued on propaganda posters I found in a google image search, printed out very small. That piece came out excellently. I've also seen terrain pieces online featuring stucco or lit windows which look just phenomenal.

FORESTS AND TALL GRASS

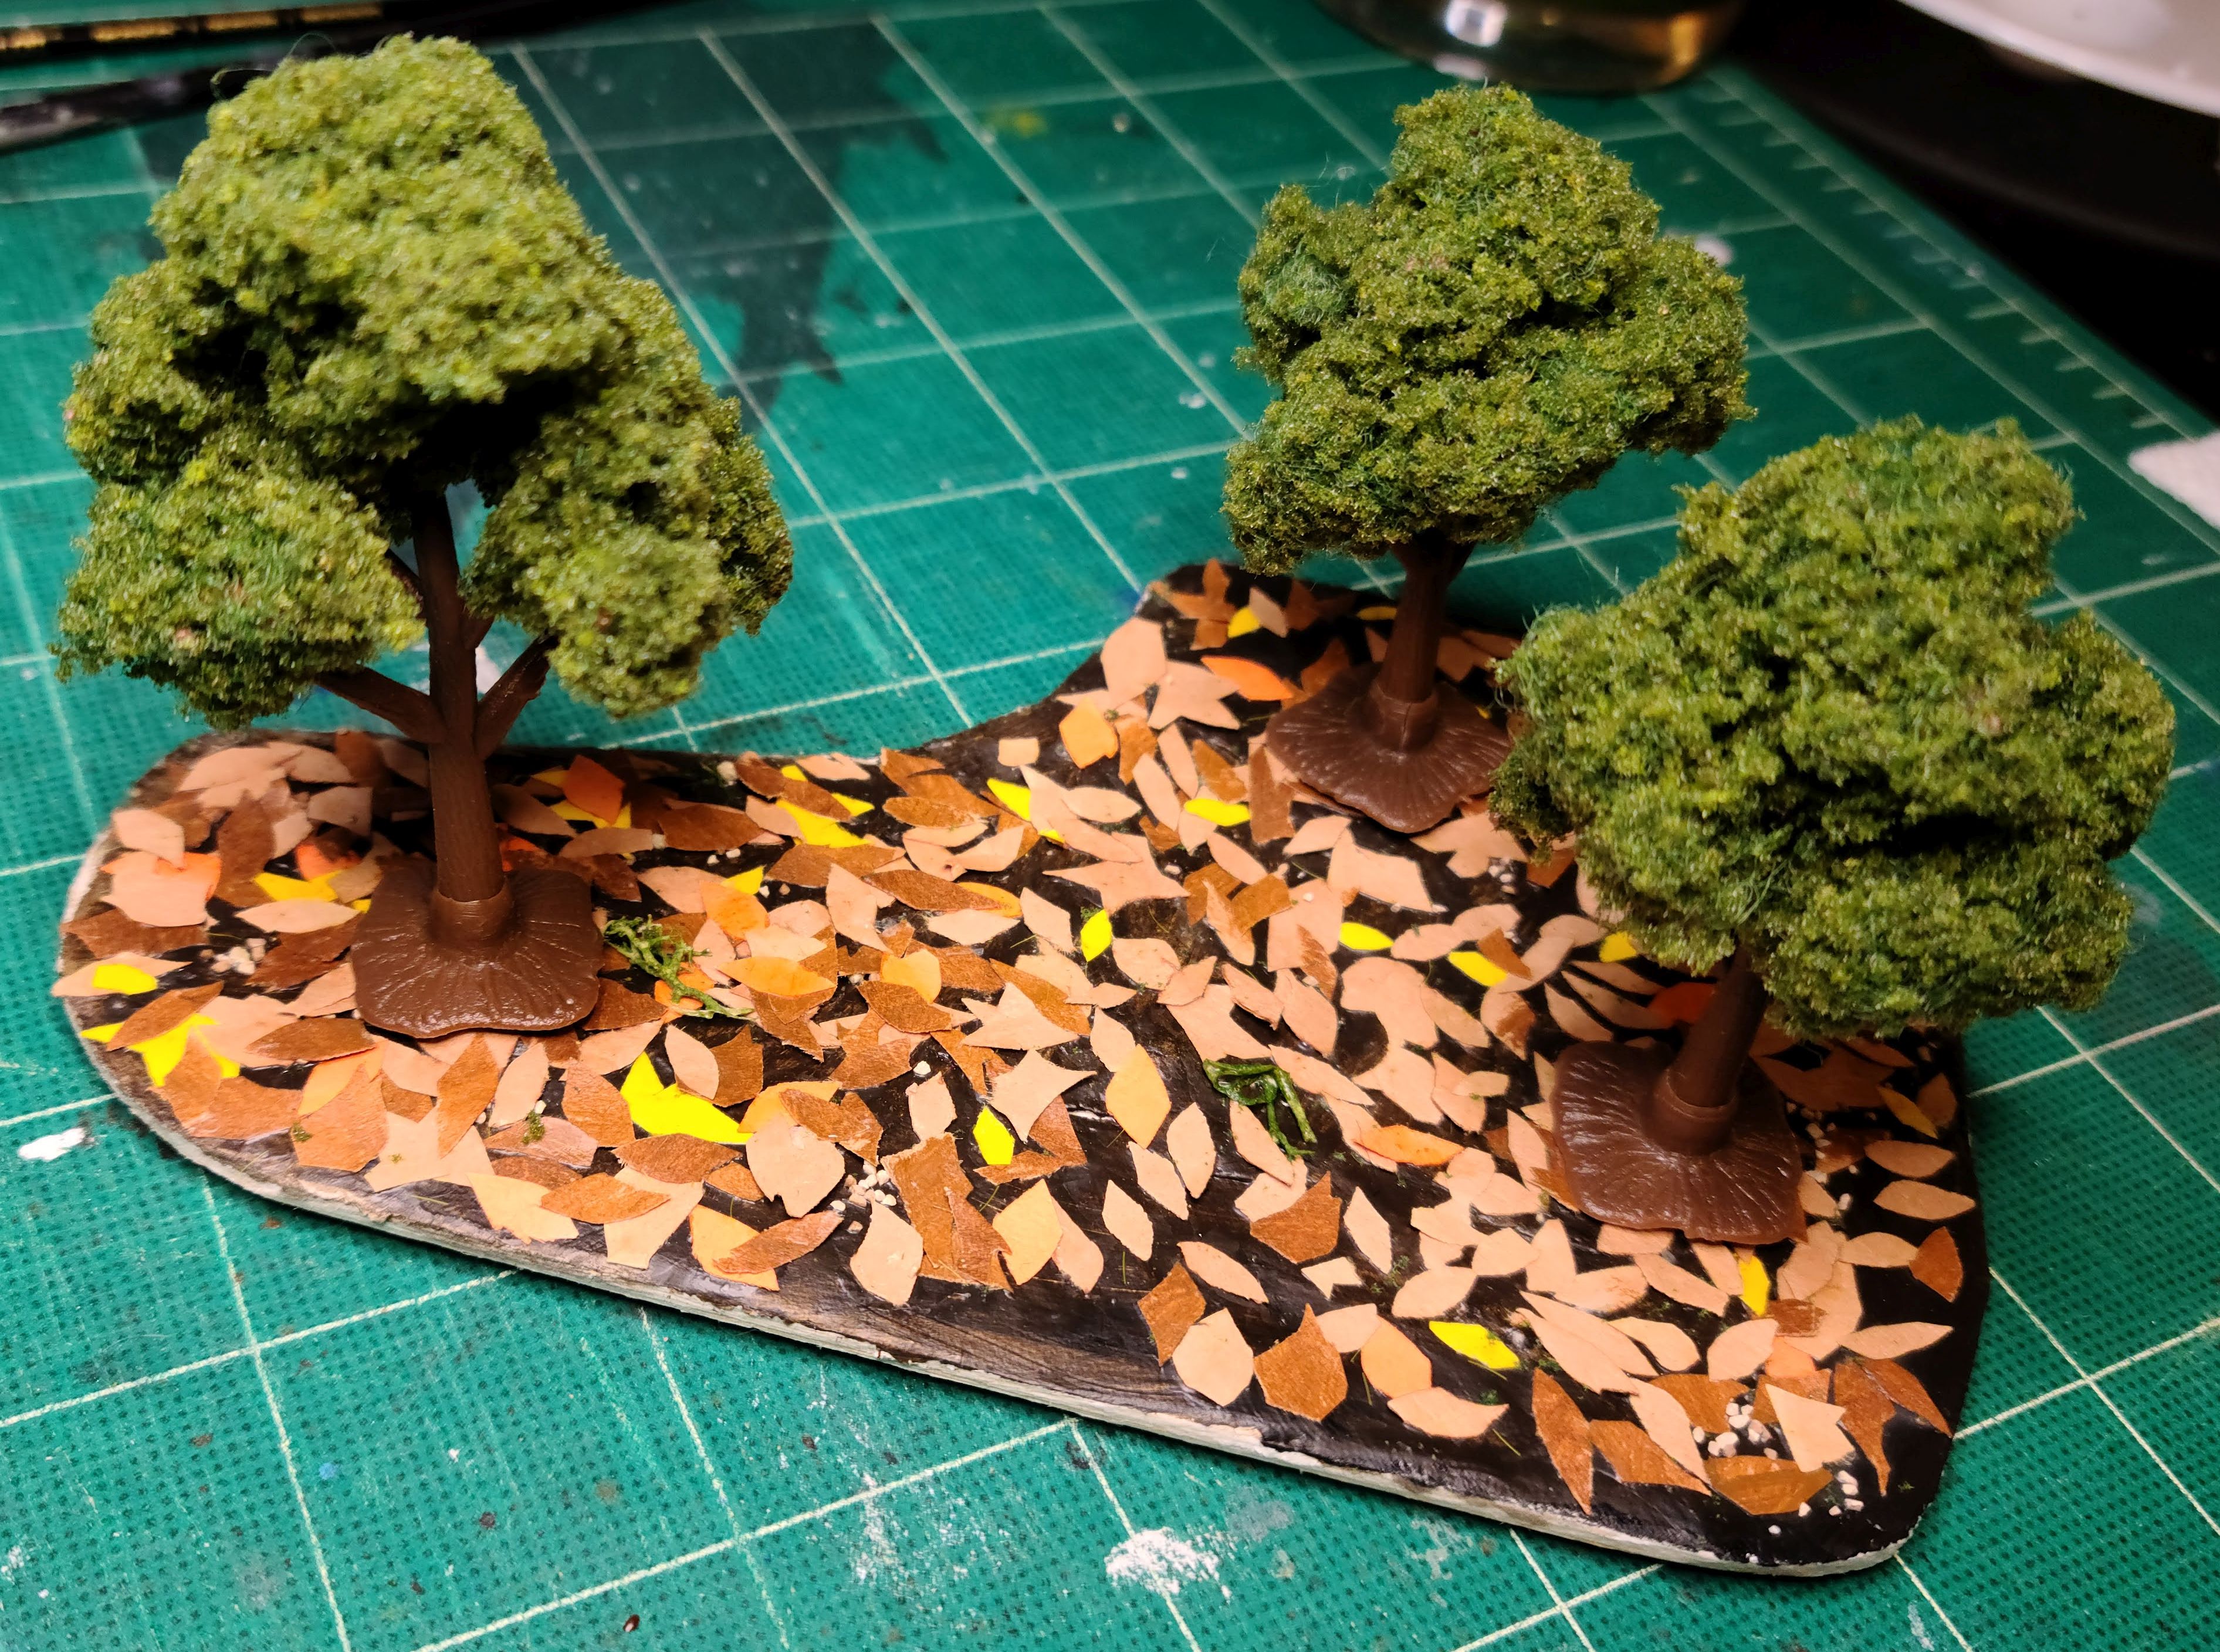
I've built magnetized forests and forests that use tree toppers, and they're the most used and most servicable of the terrain pieces I own. I particularly like the piece I built that has tons of hand-cut autumn leaves across the forest floor. 

That new 3D printed kickstarter that everyone is talking about has a tall grass terrain piece that consists of tall grass toppers. I really like that idea, and even though I'm likely going in with friends on that kickstarter, I may try to build some tall grass toppers myself. Being able to remove the grass when your models need to stand on the terrain really helps, and I like that idea better than the cut-up doormat material we always seem to use for tall grass.

SHALLOW WATER

One of the simplest terrain pieces to make, I generally just cut out an oval of balsa, paint the center blue, sometimes line the edges with clay, dirt, or grass, and then glaze over the center with acrylic gel gloss to make it look like water. 

TRENCHES

Trenches have been done so many ways, from simple to elaborate. Honestly, given how difficult it can be to actually play a game with the more elaborate trenches, I tend to prefer the simple flat ones which leave the elevation to the imagination. That said, it's one of the few terrain types I've never personally built, and I'm thinking that I should give it a go.

HILLS

There are so many hill terrain pieces that are done badly. I'm sure many of you have at some point played a game using a hill terrain with sloped sides and found that you couldn't place your model where you wanted to without it falling over. This is why so many of the more functional hill terrains have mesa-like vertical edges and flat tops. This combines some actual elevation, even if it's only an inch, with flat terrain that can actually house models.

"Hills" don't actually need to be a grassy hill - I built a Khador bunker which functions as a hill rather than being habitable.

I also recall hearing about a "ridge" terrain which was used a couple years back at The Bokur Brawl. It was vaguely ramp-shaped, and was both a hill, and also acted as a wall at one edge. Cool and creative.

HAZARDS

The primary three hazards you'll see are acid bath, burning earth, and quicksand.


An acid bath can be just a green lake. That works. But you can make it any of a number of different things. I created a small pumphouse with a spout in back that's dripping green ooze, and it's got a large puddle of acid beneath it. Industrial waste.

Burning earth terrain can be any of a number of different things. My lava pit is the only one I've created, but there are endless different types of terrain which could function as fire. I've been considering building fire toppers which can be added to other existing terrains. Flaming tall grass, anyone?

Quicksand can be difficult to model. How do you indicate visually that it isn't just dirt? The one I made has a toothpick-mounted sign in the center which comes out for storage. The sign simply says "Danger! Quicksand" and serves as a pretty basic solution to that problem.

WALLS

I've built so many walls. Stone walls from real stone and crazy clue, wooden fences using balsa and speaker wire, even a barbed wire entrenchment I created by knotting 1cm lengths of speaker wire around a longer length of speaker wire and then wrapping the completed thing around a pencil for the spiral effect.


I've often been thinking for a long time about another interesting terrain piece: a wrought iron fence which blocks movement but not line of sight. You can shoot through it, but not walk through it. I think I'd need to make it small so that it didn't become an overpowered piece for shooting models.

RUBBLE, CRATERS, AND OTHER ROUGH TERRAIN

The only truly good crater terrain pieces I've seen are the 3D printed ones. I created a rubble terrain piece once by gluing tiny stones to a 3" x 4" building foundation and adding a mostly-destroyed building wall to one end, but it wasn't perfect.


One bit of rough terrain I've often theorized but never built is a snow terrain piece, which is simply rough terrain. But along those lines, a frozen pond piece might be fun for casual games. It would include a rule that models without cold immunity need to make a roll or end up prone. My thought was that you roll a d6 for any model contacting the ice and add 7. If that number hits the target's DEF, it falls prone. This means that a DEF 13 model would only have a 1-in-6 chance to fall, but that clumsy DEF 10 jack falls 66% of the time.

STORMS, CLOUDS AND DUST DEVILS

Clouds are created often enough by an army's special abilities, but I too seldom see clouds included as terrain. Dust devil terrain pieces just got a tweak in the December update, and perhaps we'll see them more often on tables now. Storms I never see. (models with flight treat storms as rough terrain)

Colored cotton on a base is the most commonly seen cloud terrain, but I really like the 3D-printed topper my friend magnetized to a 3 inch circular base, creating a very nice dust devil. I'm in the midst of creating an irregularly-shaped ovalish cloud which will go into my terrain bucket once it's complete. Smoke is hard to paint well.

COMBINATIONS

Lastly, terrain pieces which are combinations of what's above. A burning forest. A trench full of acid that grants cover but imparts continuous corrosion. You can do a lot here.


I once built a Crucible Guard petrochemical factory with ladders leading to catwalks beside a chemical vat. It was theoretically possible for a ranged push to knock models into the acid. Terrain construction is fun. Creating pieces that you'll want to use every game is the real challenge.

While on a long rabbit-hole doomscrolling session down the google image search page, I found this cool Privateer Press page from 2019 wherein someone built a steamjack workstation during a hobby hangout. 

This is based on a reddit post I made in February 2025

Tuesday, August 23, 2022

Terrain: Wooden Fence

A warmachine game always needs walls. I thought it'd be pretty easy to throw one together with some balsa and speaker wire.

This fence was pretty quick. I first cut the strips of balsa and painted them. You'll notice that the two on the ends are shaped differently - they're from a square dowel. 

I took 2-3 strands of speaker wire at a time, maybe 6 inches long, and twisted them together. I wrapped the wire around the dowel, then around the next fence post, twisting to hold them together. I proceeded like this until I had a fence the right length. This was by far the longest and most tedious part of the process, and I used multiple short lengths of speaker wire.

With that part done, I stuck it to a plastic base with green stuff, and after that had cured, I poured down some tacky glue, which I poured craft sand onto. Oddly, at this point, the base separated from the glue, but the glue stayed solid, forming a new base itself. Oh well, happy mistake.

I glued on that small bush and called it done. It's simple, but it's one of my favorite terrain pieces.

Tuesday, July 26, 2022

Terrain: The Rhulic Bunker

 
The terrain piece which eventually came to be the Rhulic bunker was initially inspired by a different terrain piece I'd seen while scouring Google images of fantasy wargaming terrain. I liked the largish section of porch that models could stand on, the small corner on that porch which offered a limited amount of cover, and the fact that the building was asymmetrical. The plan was that the roof would be restricted terrain, whereas the porch would be walkable, and models could enter that terrain from any angle, not needing to use the stairs. Trying to keep it simple.


I used plywood rather than balsa for this project. It's far more difficult to cut, but ends up creating a far sturdier product. The six sections that made the main body of the building were measured and cut, and held in place temporarily by white masking tape while the superglue dried. You can see a small bit of green stuff securing the small portion of the roof in place in this photo, and more green stuff at the edge of the stairs.
 
The porch is held up by three small sections of a square wooden dowel, cut to rough the size of a die. The stairs are made from pieces of a smaller wooden dowel.
 
I added the roof and painted it brown, then applied a thin layer of clay to the top of the porch. I used a roller to add a cobblestone pattern to the porch, and after it had dried, I gave it a dark wash to make the cobble pop.

I also added two painted pieces of scatter terrain: barrels at the bottom, and crates on top of the porch. I also added a dowel to the roof to act as a chimney. You can see Ossrum standing atop the roof, inspecting my work.
 
I painted the chimney red, added grey mortar lines, and painted a black square on top rather than hollowing it out. I also added a door to the back and some windows.
 
 
The windows are made from painted strips of wood, and are really just the frame, with the wall painted black inside. The door has support beams made from that same wood, and a frame made from the same dowel as the stairs.

I used the dowel to add a fortifying wall to the roof, and placed a cannon up top for Ossrum. It's the same cannon I once placed atop my Khador Bunker back in 2018, but since hills have been retired, so has that bunker. Hence, I painted the cannon the same mustard color as Ossrum and mounted it here.
 
 
After viewing photos, my friends ended up deciding that the Rhuls would be holding raves inside this place, so I named it the Dijon Rave House, owing to the mustard-colored features. I made a wooden sign and painted "DRH" on it, then used a jewelry chain to hang it.


The finished piece had a front door, ladder, and anvil sign added. I'm pretty happy with that anvil sign. I found a nickel-sized metal disc lying around after recent construction on my house, and used it for this sign, free-painting the anvil, but leaving a small strip of unpainted metal around the outside.


Tuesday, June 28, 2022

Terrain: Khador Burnt-out Building

 I get inspired quite often by thing I see online. More than once, I've imitated scenery that other folks have put together. Probably my favorite is this burnt-out Khador building. I saw photos of what the original creator called Khadoran Trenchworks at plarzoid.com, and I loved it. So I decided to create my own.


I started by cutting strips of wood, and breaking each in half at irregular intervals to get that splintered look at the top. These were secured at the bottom by laying a small second layer of wood on the outside, to which the vertical strips were super-glued, and some clay on the inside, which held the vertical strips in place while the glue dried, and then solidified for extra stability.

To match the one I'd seen, I put in two layers of vertical wood strips, gluing them to each other. This gave the whole structure extra strength.


After it was mostly assembled, I painted the base brown, the wood red on the outside and brown on the inside, and the clay on the inside had rubble pieces such as wood planks and small rocks pressed into the clay and eventually glued in place. I made sure that wherever there were gaps in the wood, I painted the brown between the boards.
 
 I printed a big Khador logo, cut it out, and then taped it in place and painted over it to get the Khador logo on the side, which turned out very nicely. 

Lastly, imitating the initial version at Plarzoid, I downloaded Khador propaganda posters from the internet and printed them out tiny, then glued them in place. They look great.

I'll continue looking for good terrain ideas online and imitating them where I can.
 

Tuesday, June 21, 2022

Custom Steamroller Zone

With all the terrain I've been designing, I decided that a 6 inch by 12 inch steamroller zone would be great. Plus, it would give me a chance to use this new roller I recently picked up.

I first used a 50 millimeter base to draw a circle in the center of a plank of balsa, and I formed modeling clay into that circle as best I could. After it dried and hardened, I glued it into place. 

Next, I printed and cut out a Cygnus. I held it in place and painted all around it. That didn't work great. I had to do it a couple times to get the shape right. When I had the rough design in place, I had to do the rest by hand.

With the centerpiece in place, my plan was then to lay clay down all around it to the same thickness, approximately an eighth of an inch. After I'd done so, I hit it with the roller, creating a textured tile effect in the clay, which I then let dry.

The result wasn't as perfect as I'd hoped. My clay was thinner than expected, leaving a bit of a step up onto the disk at the zone's center. Even worse, the clay at the edges of the zone was peeling up and was ready to break off. I had to cut the edge of the clay off and glue on a border similar to what I'd done with my docks terrain piece.

I painted the balsa border black, and hit the entire terrain piece other than the disc at the center with black/grey paint, mostly to get the area between the tiles. Then I started painting the individual tiles varying shades of brown and grey. This was the most time-consuming part of the process.

 After the tiles were painted, there was still a small gap around the disc and at the edges near the wood border. I put down some white school glue there with a toothpick, and smeared dirt from my yard into the glue. Figuring that the dirt wouldn't hold with just glue, I then sprayed the entire piece with a clear spray lacquer, layering it extra thick atop the dirt.

From there, I was nearly done. I found that there were a few sections where the roller hadn't impressed the clay as deeply as others. Those areas looked a lot like puddles in the cobble street. So I played into that. I lay down "streams" of clear gel gloss in those areas, attempting to make my puddles. And while they didn't end up looking exactly as I'd imagined, the piece does look pretty good.

Here's my custom Cygnar zone.

Tuesday, June 14, 2022

Terrain: Docks

After learning a new method for laying clear glaze over blue paint to make water, I had the idea to create a dock terrain piece. I hadn't really planned it out ahead of time, but it came together fairly quickly.

I used green stuff and super glue to stick down the eight posts holding up the docks, then I laid balsa planks between them. Cutting the slats that would sit on top was time-consuming, but I'm happy with the end result.

I glued down a border of balsa around the edges, then painted it and the bottom of the piece blue. I glued down a few small rocks, then used a putty knife to apply clear gel gloss around and under the dock.


When that had dried, about 24 hours later, I glued down some brush and stones beneath the dock. Atop the deck, I glued down a couple terrain crates and a barrel which I made with some leftover green stuff.

The bank beside the docks was the toughest part. The first version, which is not pictured here, was too steep, and models wouldn't stay on it without falling off. This version is better, but still not perfect. I put a small wooden plank on one edge to make it a bit larger for warjacks, but you need to imagine that it's ground level, and simply move models up and down as if it were.

In the end, it's not a perfect terrain piece, but it's one step in my terrain journey. I learn something every time I make one of these.

Tuesday, June 7, 2022

Custom Steamroller 2021 Objectives


I recently decided it would be nice to have a custom set of Warmachine objectives to match up with the list of objectives in Steamroller 2021: armory, observatory, cargo net, fuel cache, wreckage, and dugout.

The first objective, the armory, was made with balsa on top of the lid from a cold brew coffee container. The coffee lid's base happens to be exactly 50 millimeters: perfect. One side has warjack weapons, the other has a sword knight's shield and a spare sword, and another side has a stormblade infantryman's voltaic sword. Simple, but it works.

 
The second objective was one of my first ideas, and is perhaps my least favorite of the batch. The observatory is made from a painted plastic Easter egg. The telescope is a painted drinking straw. I cut it into segments and clipped it, incrementally curling each piece tighter and tucking it into the previous slightly larger piece. On the suggestion of a friend, I glued a tiny piece of plastic on the end as a lens. It doesn't look great.
 
Next, the cargo net. With painted clay to hold the four corner posts in place, I put some terrain crates in the center and tied together a makeshift net from twine, super gluing the twine to the posts.

The wreckage terrain piece was the simplest to conceptualize, but painting it took some time. I was pretty happy with how the Cryx wreck marker came out.

The fuel cache was another easy one. After I'd painted the barrels, putting down some clay onto a large base and painting it was nothing.

Lastly, my personal favorite, the dugout. I spent a long time asking myself what a dugout even is. All the image searches I tried returned baseball results, which wasn't very helpful. Eventually, I found images of a dugout shelter or cellar, like a root cellar. That works. The tricky part was making a hole in the ground as a terrain piece. 

I cut a hole in the top of the coffee lid, and built actual steps from balsa wood, going down from the surface at the top of the lid to the surface of the table. Then I built a shelter at the top from the same balsa. Paint, clay, and sand made up the rest. 


So how do you like my Steamroller 2021 custom objectives? The main thing I need to do now is design a case for them to transport them without ruining them.

Tuesday, May 31, 2022

Terrain: Water, Open Graves, Lava

 A large amount of the terrain I've been building has been restricted. I've built a Cygnar Watchtower, a Rhulic bunker, and a gallows (all in forthcoming articles here) and they're all restricted. So this week, I'm going to look at a few terrain pieces that you can actually walk on or through.

First, something relative simple: a lake. For this, I began with a base of thin plywood. It's difficult to cut, but when I've used balsa I've found that it warps. 
 
Trimming the corners from the plywood with a box cutter was difficult, but doable. From there, I rolled modeling clay into a tube and wrapped the edged to form a rim which would hold in the water. After the clay dried, I painted it brown and the bottom of the lake blue.
 
Lastly, the key step: soft clear-drying acrylic gel gloss which I picked up at the local hobby store. I spread that on, let it dry overnight, and voila. This one was easy.


Next up, a piece specific to steamroller 2021: The open grave terrain. It's specified as a piece 2 inches by 3 inches, so I cut the plywood to the correct size, and began with the same rim I'd put on the lake, painted brown. But this time, I first glued down some grass flock, and then some coarse sand on top. Again, quite easy.

The final piece was a bit less easy. Similarly to how I'd wanted a piece that caused continual corrosion when I created the sludgehouse, I wanted a terrain piece here which would cause continuous fire damage. "Burning Earth" sounds so generic. What about lava?

My inspiration began when I found a hunk of asphalt outside which looked like it might be volcanic rock. Throwing it against the ground a couple times broke off a few perfect-sized chunks for terrain.

I began with an oddly-shaped piece of thin plywood as a base, and created a deeper clay rim along three sides of the edge, thinking that the lava would be flowing up from underground. This rim got painted black, and I super glued appropriately-sized pieces of asphalt to it. Then I painted the center yellow, and after it dried I glued down more asphalt right into the center, for models to hop across the lava if they were feeling brave or fire-immune.


You can see my work-in-progress piece above, and the complete terrain piece below.


Orange went atop the yellow, and red atop the orange, providing that glow effect. I even watered down some black paint and dripped it in for that cooling-lava effect. After it was done, I applied glaze to the lava to make it look shiny and wet.

It's one of my heavier terrain pieces, due to all the asphalt, but that just means it won't slide around on the table accidentally as easily as the lighter pieces.


Tuesday, May 24, 2022

Terrain: Magnetized Forest

 Forests can be great terrain pieces, but you need to be able to move the trees out of the way if a model wants to move into the forest. I've seen a number of solutions to the problem, but my personal favorite is magnetized trees.


 When I started this terrain piece, I had the idea of putting down fallen leaves on the forest floor. So after I cut the base out of craft plywood and painted it brown, I started looking for a leaf-shaped hole punch or something. In the end, I couldn't find one. I cut the leaves out of construction paper individually. I overlapped multiple pieces of paper so that it wouldn't be so painful, but it did still take quite a while, and I threw out a lot of badly-shaped paper leaves.


White school glue works great for gluing these down, as it becomes transparent when it dries. I also glued down a bit of scrub brush/grass stuff that I'd picked up years ago from a craft store.


 Magnetizing the trees was the interesting part. I had used green stuff to stick down three small metal washers before I even painted on the brown beneath the leaves. Then I carved small holes into the bottom of each tree and shoved in a small magnet, which I super glued in and covered with green stuff to prevent the magnet from being pulled out by its magnetic hold to the washer.

I also painted a small red X on each spot that held a hidden washer so that you could tell where to place the trees. It works very well.


Tuesday, May 17, 2022

Terrain: Sludgehouse

This was one of my first terrain projects, earlier this year. I'd created custom terrain before, back in 2017, but this was my first in a while, and I hadn't previously used clay, acrylic, gesso, or a few other things I'm now using.

We had no acid bath terrain pieces; nothing with continual corrosion. I thought up a pumphouse type of building which was spewing out toxic waste, and this was the final result.


The building is simply four pieces of craft plywood, attached with tape on the interior. I then spread a thin layer of modeling clay over that, and cut a small rectangle out of the clay on the front for a door. I cut a small piece of balsa wood, painted that, and we had a door. 
 
The roof was a bit of a pain. After cutting out two roof pieces and the two triangles for the sides, I did my best to assemble them, which was a pain. Then clay went over that as well, and I used a toothpick to carve tile shapes, which worked... kind of.

The sludge was a separate piece. Three thin levels in all, with clay forming a tiny hill. I let green paint collect in the center, and glazed it to give it that shiny caustic look. The outside got painted brown, and then I put down white glue to stick down the craft sand.

I painted a section of bendy straw black, shoved it into the clay at the back of the house, and got a bit of the green sludge into the pipe, dripping out its bottom.

All in all, it's not my favorite terrain piece, but it was one of my first since back in 2017. Stay tuned - the projects get better.

Monday, April 2, 2018

Terrain Building: The Khador Bunker

A while back, while surfing for Warmachine blogs, I stumbled across a six-year-old blog post about terrain-building. That post contained an image which for some reason really spoke to me. Based on that image, I decided to build some terrain.

Monday, April 10, 2017

Terrain Building: Stone Wall

I've got a bit of decent terrain for when I play games at home, but I didn't have anything like a stone wall template. Paper slips around too much, and you've got to tape it down, plus I much prefer 3d terrain when possible. Know what, though? I've got gravel in my yard. Why not make my own stone wall?

I had a bunch of that clay from the craft store which hardens when you bake it, so I grabbed some of that and some gravel and built a little wall on top of a base which I cut from some of that thin clear plastic. Then I baked it in the toaster over for 10-20 minutes at something like 200 degrees, since that's what the clay recommended. When it was done, I let it cool and crazy glued the crap out of it just to be sure.

The clear plastic base is a bit warped from the baking, but who cares? You can't tell. And now I've got a nice-looking stone wall. Only problem? It's surprisingly heavy, as it's actual stone. I wouldn't want to have to travel with it.