Showing posts with label Analysis. Show all posts

Tuesday, January 16, 2024

Making Sense of Steamroller 2024: Invasion

Privateer Press's Steamroller 2024 is out, and some of the new scenarios are outright bananas. After taking a close look at each of the new scenarios, I thought it would be worth spending a little time to give each a quick analysis and review. 

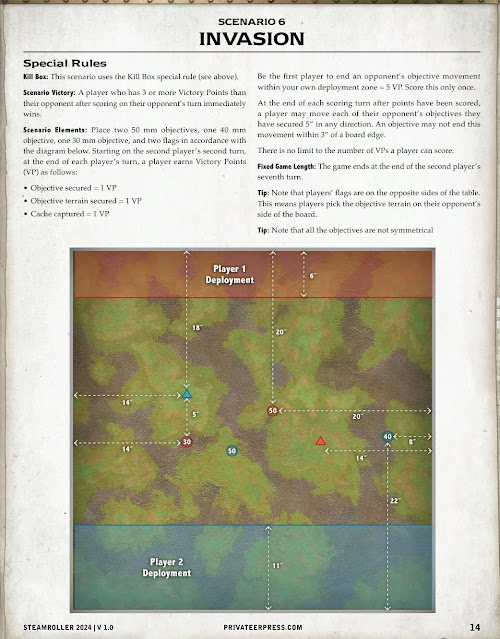
Invasion is another favorite of mine, owning largely to the thematic nature of the scenario. The goal in this one is to capture an enemy objective and drag it back home. Once it's in your deployment zone, you basically win.

Invasion has two 50mm objectives, one 40mm objective, one 30mm objective, and two flags. I find this to be the oddest layout in the packet. The 50mm objectives are both in the center, 20 inches up from the back board edge, but the 40mm objective is way over, just eight inches from the side. And the 30mm objective on the other side of the board is far more central. 

The flags are wacky on this scenario, and although it's really difficult to tell from the illustration on the map, I believe that both flags are eighteen inches up from the back and 14 inches from the side. These flags are placed opposite to how they normally are, which means that players will be picking the objective terrain on their opponent's side of the board. This likely means that objective terrain will be located far more centrally that in other scenarios.

Another wacky thing about this scenario is that while the primary goal is to move the 50mm objectives back into your own deployment zone, the 30mm and 40m objectives can be moved as well, but only by the opposing team. This scenario is likely to see the same terrain issues as with Payload, and players will need to quickly learn to spot obstructions which may hinder their ability to drag those 50mm objectives back home.

I also imagine this scenario having a bit of a reverse rubber band effect, where the further from the center those objectives get, the easier it is to score and thus to drag them. 

I'm sure that certain scenarios will quickly gain reputations. I look forward to seeing which are which, and to experiencing the new Steamroller goodness. Happy gaming!


Monday, January 15, 2024

Making Sense of Steamroller 2024: Two Fronts

Privateer Press's Steamroller 2024 is out, and some of the new scenarios are outright bananas. After taking a close look at each of the new scenarios, I thought it would be worth spending a little time to give each a quick analysis and review.

Two Fronts has two 50mm objectives, two 40mm objectives, and that one wacky 30mm objective. 

This scenario is far less complex than most others in the Steamroller 2024 packet. Two 50mm objectives on one side, and two 40mm objectives on the other side, with the 30mm objective sitting square in the middle, just nine inches away from player two deployment.

The solo rules twist in Two Fronts is that if a player scores both 50mm objectives or both 40mm objectives, he gets 4VP rather than just 2VP. I foresee a lot of unit-on-unit skirmishes happening between the two 40mm objectives.

Other than that, Two Fronts is extremely straightforward. Stay tuned for tomorrow's review of the final Steamroller 2024 scenario: Invasion!


Sunday, January 14, 2024

Making Sense of Steamroller 2024: Payload

Privateer Press's Steamroller 2024 is out, and some of the new scenarios are outright bananas. After taking a close look at each of the new scenarios, I thought it would be worth spending a little time to give each a quick analysis and review.

When I first read the Steamroller 2024 packet and came to the realization of what Payload actually was, it immediately became my favorite of the scenarios. I can't guarantee that will remain the case after I've actually played them, but the notion of pushing an enormous explosive payload towards an enemy building is so narratively cool that it makes the scenario just work.

Payload includes two 50mm objectives, two 40mm objectives, one 30mm objective, and two flags, which of course become the scenario terrain pieces.

The inclusion of one 30mm objective rather than two immediately caught my attention. The 40mm objectives are placed symmetrically - the first player will begin 22 inches from the opponent's 40mm objective, and the second player will begin 17 inches from his opponent's 40mm objective, due to the second player's further deployment. The flags and the 50mm payload objectives are also symmetrical. But then you have this crazy 30mm objective which sits only on one side of the board, just nine inches from the second player's deployment zone. This feels like a fairly large player two advantage, especially since capturing that area of the board will make it easier to push the payload right into the scenario terrain.

When a player scored a 50mm objective (these objectives I'll refer to as "the payload") he moves the objective three inches toward the opponent's objective terrain. Furthermore, the payload is pushed an additional inch for every other objective that the player scored that turn. 

As if that weren't enough, there's the Made to Haul rule, which allows a cohort model a free 5 inches of after-activation movement directly towards it, allowing that cohort model to potentially score (and push!) the objective again on their opponent's turn. The movement is five inches rather than just three to allow for extra movement that the objective may have gotten from scoring other objectives, but because of the was the rule is worded, it's also possible to use that movement to move a model other than the one pushing the objective. This should allow for some interesting movement shenanigans.

I can easily visualize a mob of models blocking the payload from making it those last few inches. It's such a dramatic image. I've already spoken to a friend with a 3d printer and suggested creating 50mm objectives that look like a giant pile of explosives, specifically to use for this scenario.

Stay tuned for our analysis of the remaining two Warmachine scenarios in Privateer Press's Steamroller 2024 packet!


Saturday, January 13, 2024

Making Sense of Steamroller 2024: Wolves at Our Heels

Privateer Press's Steamroller 2024 is out, and some of the new scenarios are outright bananas. After taking a close look at each of the new scenarios, I thought it would be worth spending a little time to give each a quick analysis and review.

Wolves at Our Heels is one of the craziest scenarios in Steamroller 2024, and introduces a number of surprising new aspects.

The scenario elements in this scenario are 50mm, 40mm, and caches. The objectives are symmetrical, but like Recon MK4, the caches are not the same distance for each player - player two again has a slight advantage.

There are two different things about Wolves At Our Heels which give the scenario extra kick. The first is the The Wolves Advance rule, which is what gives the scenario its name. The killbox advances each turn, and casters must move further and further forward. The killbox on each side begins at the standard twelve inches, but moves up to fourteen inches at the top of turn three, sixteen inches on turn four, eighteen inches on turn five, twenty inches on turn six, and if the game actually goes into turn seven, the killbox will end at an insane twenty-two inches, leaving casters just a four inch area in the center of the table. The killbox moves at the start of player one's turn, and killbox is checked for each player at the end of their own turn, so you'll at least have the time to get out of the killbox as it advances.

The second special rule on Wolves at Our Heels is the one which I find to be a far bigger deal. In this scenario, the 40mm objectives move, and they move only when scored. Then, one time, at the bottom of turn four, you measure the distances of each 40mm objective from the table edge it's moving toward, and the player who pushed the objective furthest scores 3VP, which is a huge sum in Steamroller 2024. It nearly guarantees victory. Thus, pushing that objective can be thought of as the scenario's primary goal. Furthermore, since that objective is moving towards rather than directly towards the opponent's table edge, you might be tempted to move it on a diagonal, but that's going to work against you when scoring happens at the bottom of turn four.

This also means that impassible terrain which might block the progress of a 40mm objective being pushed across the table can be a huge deal. If one side of the table has a building that a player would need to push the objective around, then choosing table sides suddenly has a lot more value, as nobody is going to want that side.

Stay tuned for our analysis of the remaining Warmachine scenarios in Privateer Press's Steamroller 2024 packet!


Friday, January 12, 2024

Making Sense of Steamroller 2024: Battle Lines

Privateer Press's Steamroller 2024 is out, and some of the new scenarios are outright bananas. After taking a close look at each of the new scenarios, I thought it would be worth spending a little time to give each a quick analysis and review.

Today, we'll be looking at the second scenario in the packet, Battle Lines. Battle Lines introduces a new twist to scenario play: the objectives move. While not as mind-bending as some of the later scenarios in this packet, moving scenarios do add some complexity.

The scenario elements in Battle Lines are 30mm and 40mm objectives, and two flags which will become terrain scenario elements. 

The scenario elements in Battle Lines are actually completely symmetrical, which is unusual for steamroller 2024.

Scoring begins, as always, on the second player's second turn, which gives player two the first chance to score. Starting then, after points are scored, the player ending their turn must move one of the table's four objectives three inches toward the opponent's table edge.

As straightforward as this sounds, there's a lot to think about and take note of here. Firstly, unlike other scenarios, in Battle Lines, an objective is moved every turn regardless of whether it was scored or not. Also, the player ending their turn can choose any of the four, which is important to note because in other scenarios only some objectives will move. 

Scenario elements are moved towards the opponent's table edge rather than directly towards the table edge. This is important to note, because as long as you're moving just a half millimeter towards that table edge, you can take the rest of the movement sideways.

The last thing to note is that when you move objectives, they'll move through any models in their way if they can get completely past them. If not, the objective must stop its movement short. This means that if you want, you can theoretically block the objective's movement. It's unclear to me whether you can have it hit a building and stop, or whether you're then required to have it move to one side in order to get its full three inches of movement.

Stay tuned for our analysis of the remaining Warmachine scenarios in Privateer Press's Steamroller 2024 packet!


Thursday, January 11, 2024

Making Sense of Steamroller 2024: Recon MK4


Privateer Press's Steamroller 2024 is out, and some of the new scenarios are outright bananas. After taking a close look at each of the new scenarios, I thought it would be worth spending a little time to give each a quick analysis and review.

Today, we'll be looking at the first scenario, Recon MK4, which is easily the most straightforward Warmachine scenario in the packet.

One of the more substantial changes to Steamroller 2024 is the change to deployment zones. The first player will now deploy at only six inches rather than seven, which was previously the case. The second player gains an inch, now deploying at eleven inches rather than ten. Thus, the total distance between the two players remains the same, but one player gains an inch, and the other loses an inch. We can hope that this may alleviate first player advantage.

Killbox is still twelve inches, and the game is still fixed at seven rounds.

Gone now are circular and rectangular zones. They are replaced by 50mm objectives, 40mm objectives, 30mm objectives, 20mm flags, and 20mm caches. The 50mm objectives are scored by warjacks and warbeasts; models must be within 3" to score or contest. 40mm objectives are scored by units. All members of the unit must be within 3" of the 40mm objective to score it, and a model within 3" can contest. The 30mm objectives are scored by a solo within 3", and contested at 3" as well.

The cache is a new scenario element. Caches can be scored by any model, but that model must give up its combat action while base-to-base with the cache in order to score it. A scored cache is removed from play, and can thus be scored only one time, similar to destroying an objective in Steamroller 2023.

The flag is an extremely interesting new scenario element in steamroller 2024. Before deployment, each player moves their own flag to a terrain piece within five inches of that flag. It cannot be a hazard or a piece of scatter terrain, but any other terrain is valid. That terrain is now a scenario element which can be scored by any two models within two inches. You heard me right - any two models. So you might have a warbeast and one model in a unit within two inches, and that's good enough to score it. If the terrain piece is something like a cloud or a forest, it can also be scored from within the terrain piece. However, while bunkers and guard towers can be scenario terrain elements, models cannot score from within a bunker or guard tower.

Looking at the Recon MK4 scenario, it's pretty straightforward.


There's just one more thing I'd like to point out about this scenario: the caches are not equidistant. One is 20 inches up from the red side, and the other is eighteen inches up from the blue side. This means that while the first player has 24 inches to go in order to reach that cache, the blue player has only 17 inches to go, and that seven inch advantage seems pretty significant.

Stay tuned for our analysis of the remaining Warmachine scenarios in Privateer Press's Steamroller 2024 packet!


Saturday, July 2, 2022

Battle Report: Skorne (Morghul1) vs Khador (Old Witch 1)


Skorne deployment

Skorne (Masters of War)

  • Master Tormentor Morghul
  • Aptimus Marketh
  • Cyclops Savage
  • Cyclops Savage
  • Cyclops Savage
  • Titan Gladiator
  • Paingiver Beast Handlers (max)


Khador deployment

Khador (Armored Corps)

  • The Old Witch of Khador
  • Scrapjack
  • Destroyer
  • Marauder
  • Man-O-War Shocktroopers (max)


Deployment 

Deployment

The scenario we'd rolled was Recon II, which favored jacks and beasts.

The terrain had a large lake, tall grass, and a bush obstacle on the left, and a house, two forests, and rubble on the right.

I won the roll and chose the side with the house to hide behind. My opponent decided to go first.

My opponent chose the wreckage objective, as always, and I chose fuel depot for pathfinder - useful with the giant forest nearby.


Khador Turn 1 

End Khador Turn 1

Scrapjack runs behind the bush. The rest of Khador runs up as best it's able. Man-O-Wars get Iron Flesh.


Skorne Turn 1 

End Skorne Turn 1

A cyclops gets rush and abuse and runs up into position to charge next turn. Aptimus Marketh and Morghul hide behind the building, and the titan sneaks around.


Khador Turn 2 

End Khador Turn 2

The destroyer and man-o-wars roll obscenely well and shoot out the lead cyclops entirely.

My opponent forgets that Aptimus Marketh's shots are ghost shots, and puts up a murder of crows in front of the house.


Skorne Turn 2 

End Skorne Turn 2

A cyclops gets enrage, abuse, and admonition, and charges into the shield wall, killing the objective and one man-o-war. Beast handlers try to move to contest the zone but can't get there through the forest. The last remaining cyclops blocks for Morghul. The titan backs up to avoid being charged.

Each player scores one zone.

(Skorne 2, Khador 1)


Khador Turn 3 

End Khador Turn 3

Man-O-Wars surround and destroy the cyclops. One Man-O-War's arm falls off. The marauder toes the zone, inviting a charge.

The Old Witch feats to prevent anyone from entering her zone. Khador scores that zone.

(Skorne 2, Khador 2)


Skorne Turn 3 

End Skorne Turn 3

The titan gets enrage and admonition and kills the marauder. A cyclops charges and kills a single Man-O-War, leaving a second on one box. One of the hits was a crit because I needed a five to hit and rolled a 3, then future sight boosted and rolled a second 2. Morghul hides behind the building. Beast handlers were unable to contest the zone because of Old Witch's feat.

(Skorne 3, Khador 3)


Khador Turn 4 

End Khador Turn 4

Man-O-Wars do their thing and destroy another cyclops. Old Witch puts up a murder of crows in front of the house.

(Skorne 4, Khador 4)


Skorne Turn 4 

End Skorne Turn 4

Aptimus Marketh shoots a man-o-war. Then the beast handlers press forward. Two run into the zone, one charges the man-o-war with a single box, missing. The titan kills two man-o-wars, but realizes too late that he's now left the zone, and it doesn't get scored.

(Skorne 4, Khador 4)


Khador Turn 5 

End Khador Turn 5

Scrapjack runs up, Old Witch channels gallows and pulls the titan B2B with scrapjack, the man-o-war runs around behind the titan, and then the destroyer destroys the titan.

(Skorne 4, Khador 5)


Skorne Turn 5 

End Skorne Turn 5

Morghul gives himself admonition and moves to score the flag. Marketh shoots at the destroyer, needing a 5 to hit, and misses. Beast handlers charge.

(Skorne 5, Khador 5)


Khador Turn 6 

End Khador Turn 6

Scrapjack charges and kills Aptimus Marketh. The destroyer walks over and kills the beast handler in the zone, and Yuri the one-armed man-o-war charges and kills another beast handler, ending right next to Morghul, contesting the flag.

Khador scores two.

(Skorne 5, Khador 7)


Skorne Turn 6 

End Skorne Turn 6

Two beasts handlers run to engage Old Witch. One attacks Yuri the one-armed man-o-war. Morghul moves up along the zone and feats.

(Skorne 5, Khador 8)


Khador Turn 7 

End Khador Turn 7

Due to Morghul's feat, Khador cannot spend focus this turn. We misinterpreted the feat slightly in that it should have affected only non-warcaster models.

Yuri kills the beast handler harassing him. The destroyer takes a single unboosted attack on Morghul, needing a 9 to hit, and of course he hits. A miss would have let Morghul dodge two inches away and secured a victory.

Old Witch kills a beast handler and leaves the zone.

(Skorne 5, Khador 9)


Skorne Turn 7 

End Skorne Turn 7

With only two models on the board, and ready to lose on points if there were another round in the game, an assassination is my only choice. It's doable, as long as the free strike misses. Morghul walks away from the destroyer, and its free strike needs a 7 with the rear arc bonus. Morghul dies.

(Khador Victory!)


End game

Final Thoughts

  • Swingy dice were, as always a factor. After the game ended, we rolled out the assassination out of curiosity. Morghul would have managed to kill Old Witch.
  • I had a habit in this game of sending in beasts one by one and having them killed one by one. With buffs that cost two fury and a five fury caster, it isn't possible to buff all my beasts at once, but perhaps I need to stop relying on admonition to keep my beasts alive, as it has never once worked.

Friday, December 14, 2018

State of the Cygnar, End of 2018

After this year's WTC, many players are asking themselves whether Cygnar is competitively viable. And while an analysis may be laughable when it's coming from a non-competitive player such as myself, please realize that armchair quarterbacking is a thing, and that while I may not actually play Warmachine, (sarcasm) I do listen to multiple podcasts weekly and participate on multiple forums.

That said, let's go down the list of Cygnar's 21 casters, and look at where each of them sits. I'm not going to letter grade them, but I'll try to make the call about whether the caster ought to get some CID tweaking.


Friday, November 2, 2018

Hunter or Charger?

It's a question I've seen discussed many times. While people are normally trying to analyze ranged damage, there's a lot more to be looked at here. Let's take a quick look at the pros and cons, and compare Cygnar's two favorite ranged light warjacks.


Friday, August 24, 2018

Analyzing WTC Cygnar Lists

The September 15th World Team Championship is fast approaching, and the lists were recently announced. I thought it would be useful to look through the 64 cygnar lists that appear at Conflict Chamber's WTC list site and determine the most popular and interesting ones.


It's no surprise that Haley3 is the most popular caster, with 18 lists, 16 of which are gravediggers. The other two are storm division, and to be honest, I'm not sure I understand how either of the two works.

Siege1 appears with ten lists, six of them Sons of the Tempest. I guess those POW10s have a lot less trouble breaking armor when it's halved. He's also got three lists in heavy metal and one in storm division.

Haley2 is making a comeback in third place with nine lists: Six in heavy metal, two in Sons of the Tempest, and one Storm Division.

Siege2 appears in six of the WTC lists, five of them in gravediggers and the remaining one in storm division.

The once-great Nemo3 is down to only five lists, three storm division and two heavy metal. Sloan has four heavy metal lists, Stryker2 has three storm division lists, and Stryker1 has two heavy metal lists.

Haley1 shows up twice, once in heavy metal and once in sons of the tempest. And then we've got one appearance each for Caine3 storm division, Nemo1 heavy metal, Kraye heavy metal, Maddox storm division, and... what? Nemo2 sons of the tempest?? Now that's an odd one, Hungary. Damned if I can even remember what Nemo2 does.

Let's see, it's got a couple centurions, a firefly, and a lancer. Those centurions will be anchors - one with arcane shield and the other with fail safe. Wait - the list has no junior? Weird! Uhh, okay... gun mages running a cyclone, which is always a good combo. Arlan and Falk are there to work together to give either a centurion or the cyclone that damage buff, Black 13th is good, and Anastasia for the critical roll to go first. Polarity shield can make unchargable gun mages or black 13th, who can then close in with gunfighter and Falk for pistoleer-boosted POW12s. Field mechanics should keep the centurions in working order, and be able to score a circle zone. It's an unusual list. I hope it works.

Others that immediately catch my attention? Denmark's Siege1 Sons of the Tempest / Siege2 Gravediggers lists. Both Denmark teams are using identical Siege1/Siege2 lists. They must really like those lists.

Also, every Cygnar list on every USA team is in gravediggers.

But one of the things that I've noticed most is that a lot of teams just aren't taking Cygnar at all.


Monday, July 9, 2018

Cygnar Storm Division Deep Dive, Part 4/4: Storm Division Solos


When I typically think of storm division solos, I'm generally thinking of the Stormblade Captain, Katherine Laddermore, and the new grenadier solo Gwen Keller. But there are other solos available in the theme as well. The stormcallers are technically solos, but I did cover them in part three. And of course, Cygnar's two auto-include solos, the squire and the journeyman warcaster, are also available in Storm Division, but I won't be talking much about them either. The other two I'd love to cover are Lieutenant Allison Jakes and Arlan Strangewayes, but there's so much to talk about with each of them that they each deserve their own article rather than one lumped into a Storm Division analysis.


Tuesday, July 3, 2018

Cygnar Storm Division Deep Dive, Part 3/4: Storm Towers and Other Stormsmiths

The stormsmiths are the seldom-seen stepbrethren of the storm knights. Aside from those stormsmiths lucky enough to sit atop the storm strider, they're not often seen. Today, I'll be taking a close look at three different stormsmiths, and where they fit into the Storm Division army.


Stormsmith Stormcallers

The stormcallers are the gun mages and long gunners of the storm division: accurate, but low-power. Stormcallers solve three different problems that storm division can have issues with, and that's why they're most often taken.

Firstly, stormcallers are Storm Division's sole answer to stealth. Their walk-and-shoot threat is a respectable 16 inches. Unfortunately, they're an extremely low-POW answer to stealth, and so they're not useful against Shadowpack beast bricks.

Secondly, the stormcallers' lightning attacks are also magical, which means they're able to take out gremlin swarms, Blackbanes, and other incorporeal models. Magical weapons aren't a huge shortage in Cygnar, but storm division has fewer than Cygnar's other themes.

Lastly, the stormcallers' attacks are surprisingly accurate, as they ignore cover, concealment, and elevation. That trencher who was dug in on a hill is no longer DEF19 , now he's DEF13, and your stormcaller only needs a 7 to take him out.

The reason I most often took stormsmith stormcallers in Mk2 was because of their storm strike's disruption ability. It used to be that any hit on a warjack from a stormcaller would disrupt the jack. It was very strong. But in Mk3, this has been downgraded to critical disruption. A normal attack from a stormcaller has only a 16.6% chance to get that disruption, and a POW10 is pretty unlikely to do any significant damage to that warjack. If you were able to boost that attack, the chances would go up to 44%, but it's nearly never worth applying any kind of boosting effect, as stormcallers are solos rather than a unit, and a spell like deadeye would only affect a single stormcaller.

All this being said, the stormcallers are extremely squishy, and their 13 defense will do little to save them from blast damage or accurate shooting if they move out in the open to get triangulation attacks.

Similar in some ways to long gunners, stormcallers are all about getting a large volume of reasonably accurate low-power attacks. On their own, each stormcaller can make a single range 10, POW 10 storm strike, threatening 16". Pew pew! But when two line up, a stormcaller can attack any two models in a line drawn between two stormsmiths, meaning the attack on one of them can threaten nearly 26", assuming that another stormcaller can reach that 26" mark. The best of all is when three models can form a triangle and allow for the stormcaller triangulation attack, which allows each stormsmith to make up to three attacks against models within the triangle.

There are a number of triangulation tactics you may want to try to maximize your stormcaller shootiness, the most obvious of which is running a single model and sacrificing his attack(s) to give the other stormcallers a triangle which they can then use to triangulate, resulting in more overall attacks. Since the stormcallers are not a unit, you can even have one run while others aim.

There are also a number of other models who can participate as members of a stormcaller triangle, even if they can't make the actual triangulation attack themselves. They are the storm strider, the stormpod, and the stormblade infantry standard. The fact that stormcallers are solos rather than a unit allows you to deploy them at the extreme left and right flanks and run forward until it's time. When you're ready, you can score triangulation attacks even if your stormcallers began your turn 38 inches apart! One simply runs 12" inward, leaving it 26" away, then the other walks 6 inches to the 20" mark and uses the triangulation special attack. Granted, I don't recommend actually leaving them a full 38 inches apart as they move up, but that measurement should serve to illustrate how far apart they can be and still remain a threat.


Stormsmith Storm Tower

The Storm Division's only artillery piece, the storm tower has an odd role. On one hand, it looks at first much like the storm strider, which is one of Cygnar's strongest models. And while it only gets one shot to the storm strider's two, it costs less than a quarter of the strider's points. But it's not only the fact that it's one POW less that makes it such a relatively poor piece. It's mostly the fact that it has no way to boost damage, so its POW14 attack isn't going to do much to enemy heavies. And it has no way to boost the hit roll, meaning that the lightning generator may be entirely lost if the RAT6 attack misses enemy infantry.

Caine0's fire for effect spell would do much to make the storm tower viable, but despite the fact that War Room allows you at the time of this writing to include Caine0 in a Storm Division army, it's rumored that this is a bug, and that Caine0 isn't an allowed model.

The storm tower walks 3 and runs 5, so long as the grunt is still alive. This allows it to make it up to the 15 or 18 inch line by the time it wants to shoot on turn two, threatening to the 29" or 32" line, but only if its target is directly across from it. This means you'll generally want the storm tower to look for decent defensive terrain, such as a wall or a hill, and to threaten circle zones into which the enemy will be inclined to bring infantry.

As odd a niche as the storm tower brings, it's only situationally useful. I love the look of the model, but despite having owned it for about a year, I've only put it on the table once.

Stormsmith Grenadiers 

One of the most recent storm division releases, this 7-point 3-man unit has a lot of utility, but with only a six inch range and no ability to reposition, each is likely to get one shot per game with a grenade.

They're pretty resistant to shooting. Force Barrier makes them DEF15 even without terrain bonuses, and they're entirely immune to blast damage, which is usually how all my high-defense infantry dies. So the real trick with the grenadiers is: how do you deliver a grenade or two and not have them immediately charged?

One option is to put them in a spot where a valuable enemy model such as a heavy can in fact charge them, but then have your own heavy ready to retaliate. This leaves your opponent with a decision: sure, that driller can charge and kill the grenadier, but then your own ironclad walks in and takes out the driller, and your opponent has just given you a 10-point model in exchange for the 2.3 point grenadier he killed.

A second option is to screen them. You can have your grenadiers all walk up and throw grenades, and then run some stormblades past them. You would, of course, only do this if the threat to the grenadiers was a melee charge, and ideally you'd have the stormblades with iron zeal and arcane shield this round.

Another excellent option is snipe. If you're running a Stryker1 stormlance brick, a Caine1 stormblade gunline, or a Maddox list, this is a potentially very good option. You can juggle snipe between Caine's stormblades and the grenadiers, or onto Stryker1's colossal. Range 10 grenades are actually relevant.

The grenadiers' kinetic grip grenade is the reason Haley1 got nerfed into near-unplayability. Her temporal barrier spell stacks with a kinetic grip grenade, meaning that anyone hit suffers -4 speed. This means something like a driller has a speed of 0 and can only move if it charges. Anything 4.5" away is perfectly safe, and if Haley hits it with a scramble spell to disrupt it, it's a useless model next turn. The fact that the grenade is an AoE means that clustered enemy models can all be hit by the same effect. In the perfect situation (which of course never happens) it's back-breaking.

The other two grenade types are Voltaic Vortex and Galvanic Blast Field. These two, unlike kinetic grip, both require a direct hit against an enemy model to get anything more than POW7 blast damage. The galvanic blast field leaves a small electric AoE which will do POW10 damage. In the right situation, this may be the thing that saves your unit of grenadiers from an enemy infantry charge next turn. But again - you don't get much choice in positioning it, since it's got to directly hit an enemy model. The final shot type, voltaic vortex, is interesting in that its area of effect depends a lot on the model you hit. Hitting a small-base model gives you an AoE not much larger than the standard 5" pie plate. Hitting a large-based model gives you a nearly 6" AoE. But hitting a huge-based model will allow the voltaic vortex to affect nearly an 8" area. Granted, it will only be pulling all those models right into the enemy colossal, but this is a good tool in your toolbox, and could come in handy at the right moment.

Next time, we'll wrap up this series and look at storm division solos.

Friday, June 29, 2018

Cygnar Storm Division Deep Dive, Part 2/4: Stormblades and Stormguard

When you hear people asking for a storm knight CID, it's usually because of the three units I'm going to review today: the Stormblade Infantry, Stormguard, and Silver Line Stormguard.

Cygnar's storm knight infantry tends to be very complex and have wonky rules. There's a lot to keep track of in terms of making sure this model is within 5" of that model, making sure that model is inside this other model's command range, and lots of additional overlapping synergies. Memorizing a model's stats are one thing, but when there are so many modifiers, and a single stormblade unit might have three different POWs on their shots because some are inside ionization and others are out of range of the storm rod, it can get sticky.

Wednesday, June 27, 2018

Cygnar Storm Division Deep Dive, Part 1/4: Stormlances

Cygnar isn't known for its units. Great warjacks, like the charger, centurion, and firefly, sure. Powerful solos like the journeyman warcaster and squire, yup. But units? Not so much.


Gravediggers has trencher infantry, which since the stormlance nerf are arguably the best unit in the faction. Trencher Long Gunners are also pretty amazing for what they do. But gravediggers is fresh off a CID that has (in my opinion) made it the best theme in Cygnar.

On the contrary, Sons of the Tempest remains (once again, my opinion) the worst theme in Cygnar. The once-great gun mages now seldom see the table, and the Black 13th have lost Lynch's true sight and Ryan's mage storm. They all die to a stiff breeze.

Being a jack theme, Heavy Metal is an odd dumping ground for units. The sword knights make sense, as their fluff indicates that they're trained to operate alongside warjacks. But original recipe long gunners are an odd inclusion.

This brings me to The Storm Division, the theme I'd like to touch on with this 3-part series. Storm Division has six units, excluding mechanics, more than any theme besides gravediggers. Today, we'll be looking at the top of the heap: stormlances. Call them lances for short if you must, but dear lord please never call them lancers. A lancer is a warjack, people.

Tuesday, May 8, 2018

CRA / CMA Math


It occurred to me recently that I don't think I've ever seen an analysis of the math behind when it's best to take a combined ranged or melee attack versus individual attacks. It seems fairly clear which is best when you're attacking very high or very low ARM or DEF targets, but there's a middle range in which it's difficult to judge.


Tuesday, March 6, 2018

Analyzing OTC Stryker2 List Builds

Continuing my Cygnaran armchair quarterbacking, I'm now analyzing the other popular Cygnar caster at the OTC. Haley3 was number three, but given that she was always in Gravediggers, and given that I don't personally have much interest in Haleys or in Trenchers, I'm skipping that one.

There were eight Stryker2 lists at the OTC this year, six in Storm Division, and two in Heavy Metal. Let's go through and analyze list composition.


Sunday, March 4, 2018

Analyzing OTC Nemo3 List Builds

Nemo3 is the biggest caster in Cygnar at the moment. On his feat turn, his two striders and dynamo melt heavies, and all the lightning generator he can bring melts infantry regardless of its defense. There are twelve Nemo3 lists at this year's OTC, half each of storm division and heavy metal. This should give us a decent sense of what's popular in his lists. Let's dissect things.


Friday, March 2, 2018

Analyzing The OTC Cygnar Lists

The Ontario Team Championships begins tomorrow, and the lists have been posted online for a while now - enough for analysis. I've pored through the 21 Cygnar list pairs looking for trends, and I have a few things to share.