Showing posts with label Hobby Corner. Show all posts

Wednesday, April 5, 2023

The Siege Oliphaunt: A Skorne Siege Animantarax Proxy


Even though we're in MK4, and the legacy factions seem doomed, Skorne is my only non-Cygnar faction. I'd been wanting a Siege Animantarax for a long time, but outside of overpriced fully painted models for sale on EBay, you can't find a Siege Animantarax anymore. So I decided to make a proxy.

After a bunch of hunting on Thingaverse and similar sites, I found an excellent elephant model. And it was free! This post is to chronicle the saga of my construction of this proxy.

Wednesday, January 2, 2019

Building a Cygnar Colossal, Part The Fourth

It's been a long time. Way back in March 2018, I started this article. Here's part 1, part 2, and part 3. The last time I remember this much time between a part 3 and a part 4 of something, it was Star Wars.

So I got started painting this thing. Boy, there's a lot more to paint on something like a colossal than there is on any other model. Boy, this takes a while.

Tuesday, May 15, 2018

Magnetizing a Stormwall / Hurricane, Part Three

The long and drawn out process continues. I still have very little time, but I was able to carve out an hour or so over the weekend and get some more done while watching Guardians of the Galaxy 2 on Netflix for what must be the fourth time.

After spending a while staring at the waist connection, I decided not to magnetize it. I'd have to chop off the large plastic nub which connects the colossal's top half to its bottom by slotting neatly into the crotchpiece. In the end, I just glued the damn thing. I think that's going to work just fine.

Wednesday, April 25, 2018

Magnetizing a Stormwall / Hurricane, Part Deux

I always knew that assembling and painting a colossal would take a long time. I didn't think it would take this long. I started in March, and I'm still not done assembling it. It's true that I get less than an hour a couple nights a week to spend on this, and there was a vacation to factor in as well as the fact that I'm generally watching TV and drinking while I work on the model. I also took a break from the colossal to build that Khador Bunker. I guess that's why it's taking this long.

Monday, April 2, 2018

Terrain Building: The Khador Bunker

A while back, while surfing for Warmachine blogs, I stumbled across a six-year-old blog post about terrain-building. That post contained an image which for some reason really spoke to me. Based on that image, I decided to build some terrain.

Tuesday, March 20, 2018

Magnetizing a Stormwall / Hurricane (part 1)

When I first magnetizined my Hammersmith / Centurion , I learned some things about magnetization. And I learned when assembling my first huge-base model (the Storm Strider) that it was also quite a job. Now, I've purchased my first colossal. It's both of those difficulties combined.


Wednesday, August 2, 2017

3D Terrain Just Looks Better

The more I've gotten into Warmachine, the more I've come to appreciate the look of the game as one of its primary appeals. I love fully painted armies on great-looking terrain. I spend more time on the hobby aspect of the game than do I playing, and maybe that's why I'm so focused on how everything looks.

That said, I think 3D terrain is just so much better than flat terrain. Sure, the flat stuff is great for cramming in a bag if you've got to travel, but my meta has had better luck just using the terrain of either whomever's house you're at, or else the terrain available at the game store.

I'll grant you - some 3D terrain is terrible. Structures that make it impossible to see what's on the other side, hills on which you can't stand a model without it falling over, or angles that make line of sight difficult to determine. If you've got any of those, you're generally better off just getting rid of it.

Friday, July 7, 2017

Thunderhead Painted!


This one took quite a while, mostly because I had little to no time to spend on painting. It was done mostly in 30-minute spurts, when I had a few minutes to put a bit of paint on the model. As I type this, I've just finished touching up a few areas, painted the base brown in prep for laying down some grass and flock, and put a second coat of dullcote on the model. Here's a series of photos that show the progression of painting from start to finish.

Tuesday, June 6, 2017

Old Arlan, New Arlan


As part of a lot that I purchased recently, I got a couple superfluous models. One was a second Arlan Strangewayes. I decided that as much as I'd liked the paint job I'd done on my first Arlan, I could do better. Plus, I had these nifty new bases that I wanted to put on some models. So the plan was to paint and base the new Arlan and sell the old one.

Saturday, June 3, 2017

My First Handle For Painting


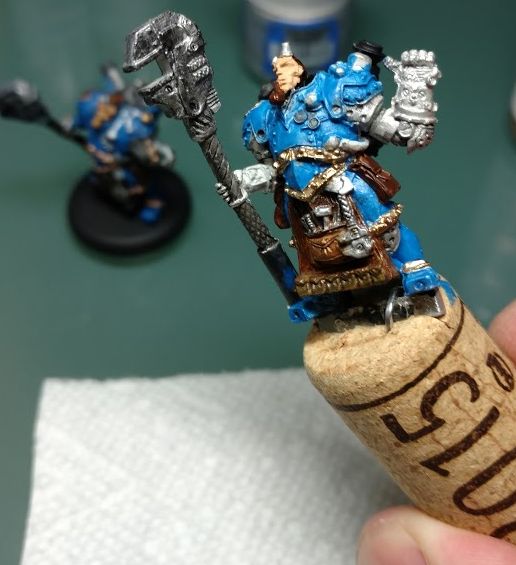
Recently, I bought a small lot on EBay and ended up with a second Arlan Strangewayes. I decided to paint him up better than my other Arlan, put him on a special base, and sell the original.

Last night, I was walking through my kitchen, saw a wine cork, and got an idea. I got a slit in the top, shoved the base in, and drove a paper clip through the cork to hold the model in place. It's not as firm as I'd like, but it ain't a bad first attempt.

I'm probably halfway done with Arlan number two. I'll show off the finished product when it's done.

Friday, June 2, 2017

Finished Painting Gibbs


Life is busy and I've had pretty much zero free time this past month. But thankfully, I actually just finished painting another model. Harrison Gibbs, a model I got for Christmas this year, is finally complete.

After I assembled the model, he'd been sitting there half-painted for a good 3-4 weeks while I finished painting a second firefly. Then I decided that I wanted to try out some of these spiffy custom bases they sell online.

After painting a few of the cobblestone bases, I decided I wanted Gibbs on the base that had a street curb so that his cat could be up a bit higher on the curb. Then I had to pry Gibbs off the stock PP base I'd glued him to and chop off the metal strip beneath his feet with wire cutters. A bit of green stuff, and he was affixed to the custom base.

I'm mostly happy with the paint job. I did a better job on the eyes here than I have at some points in the past. I wish I'd been able to get the cat to look a bit better than it does, but overall I'm happy.

Now I can brings Gibbs in the Stryker2 list I'm calling "Support Bloat", and serve Stryker up his hot meal.


Friday, May 19, 2017

Sealing Your Models with Tinted Floor Wax

A while back, I read on the PP forums that someone had done up a unit of sword knights by dipping them in floor wax. At that time, I'd just begun to consider sealing my painted models, and using something like Minwax as an alternative to Dullcote sounded interesting and very different.

Friday, April 21, 2017

Hobby Corner: Assembling Storm Lances

Storm Lances on the table
Storm lances. Every Cygnar player's favorite unit, and everyone else's most hated model. They're Cygnar's best (and arguably only good) unit, and the game's best cavalry.

Why do they have to have electroleaps on both their shots and their melee attacks? Why assault? Why do other cavalry have the lance rule but not storm lances?

Today, I'd like to talk about how to put together storm lances, not how to play them. I hit some unique problems when putting these together, and I found what I think were some pretty good solutions. I'd like to share those so that anybody else who finds themselves frustrated at the same thing might search, find this article, and maybe save themselves a bit of pain.

Monday, April 10, 2017

Terrain Building: Stone Wall

I've got a bit of decent terrain for when I play games at home, but I didn't have anything like a stone wall template. Paper slips around too much, and you've got to tape it down, plus I much prefer 3d terrain when possible. Know what, though? I've got gravel in my yard. Why not make my own stone wall?

I had a bunch of that clay from the craft store which hardens when you bake it, so I grabbed some of that and some gravel and built a little wall on top of a base which I cut from some of that thin clear plastic. Then I baked it in the toaster over for 10-20 minutes at something like 200 degrees, since that's what the clay recommended. When it was done, I let it cool and crazy glued the crap out of it just to be sure.

The clear plastic base is a bit warped from the baking, but who cares? You can't tell. And now I've got a nice-looking stone wall. Only problem? It's surprisingly heavy, as it's actual stone. I wouldn't want to have to travel with it.